Gerald McAlister | February 19, 2017 | Dev Diary


Gerald McAlister | February 19, 2017 | Dev Diary
This week’s post is a continuation of our previous one on how to use the Oculus Touch controllers in Unity. When we last left off, we had a basic setup for seeing our hands and picking up objects. For the second half of this series, we want to discuss two more key features: How to show a player’s avatar’s hands, and how to make the hand itself have collisions (specifically with the fingers). These are key features for any game or app that wants to make the most of the Oculus Touch controllers, and we want to share our methods that we are currently using for testing game ideas on our end. With that, let’s dive on in!
Let’s start off with the harder part of this: hand collisions. Hand collisions with Oculus Avatars, to be quite frank, are not easy at all. This is due to how the hands themselves are created: When your game is run, a script attached to each hand model of the Oculus Avatar dynamically creates a 3D model of the hand, and updates the animations of that hand model (a skinned mesh) based on what buttons are being pressed. While this makes it very easy to draw the hand, it makes it incredibly complicated to add collisions to. Specifically, it makes it very hard to do efficient collisions with, as we have to dynamically add the appropriate collisions to the proper locations on the hands. To kick this off, we’re gonna start by discussing some of the initial methods we investigated, and the final method we’ve been using as of recently.
Because of how the Oculus Avatar SDK renders everything, we will ultimately need to update their scripts in order to add our collisions properly. The initial attempt we did was very straightforward: Add a MeshCollider component to the hand when it is created, and then add the animated mesh each frame to the MeshCollider. This actually ended up working pretty well as far as functionality, and gave us a rather accurate physics model for the hand, but had one major flaw: It was slow. On our baseline test machines, our demo became unplayable, as during each frame the SkinnedMeshRenderer would have to create a new mesh based on the hands current animation setup, and then save that mesh to a temporary mesh, which was then used with the MeshCollider. This resulted in much slower frame rates, and was not a feasible solution. While it would have been possible to further clean this update (such as by only doing this every other frame, or using a lower poly mesh), it ultimately did not seem feasible, nor worth the time to continue exploring this option. As a result, we began to look into another solution.
Before we dive into our current implementation, we need to cover what exactly we are looking for with these collisions. Specifically, we do not actually want the entire hand to have collisions, nor do we want the same collisions for each pose of the hand. We really only have two instances where we will want the hands to have collisions enabled: When the player makes a fist and when the player points with their fingers (including a thumbs up). When the player has an open palm, enabling collisions can interfere with picking objects up, so we’ll want to not have collisions in that instance. On top of this however, the collision “models” for each instance will change too. For a fist for example, it will be a sphere more or less, while with pointing there will be a finger sticking out of the sphere for collisions. This means we will need to change this model based on what the player’s hand is doing as a result.
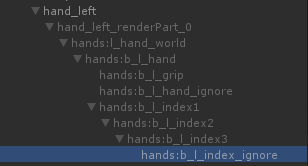
To accurately provide the collisions with a low cost, what we will do instead is provide colliders for each finger joint, activating and deactivating them as the user changes their hand controls. At first, this may sound costly, but it actually can be far more easily optimized, since we can approximate the shape of each joint much better. Specifically, we can use capsule colliders and a sphere collider for all of our joints, rather than a detailed model. This will allow for finer collisions without costing us a ton of processing time. You can see an example of how the index finger is mapped out below:
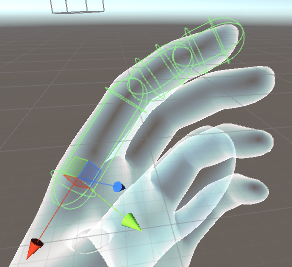
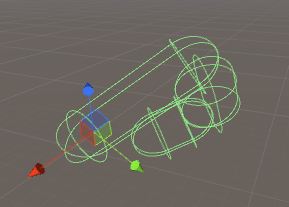
The green capsules represent our colliders in this case. Notice how there are three of them total, each one a part of the finger joints. This means that when we bend our fingers into a fist, you will get the following results:
This is nice because it requires no special code on our part, since the Oculus Avatar SDK handles these adjustments already. The hardest part of this implementation is actually adding these colliders to the appropriate spots, as you need to ensure that the scaling is correct for the hand sizes. Luckily, we’ve already gone ahead and done these measurements for you, so you can just follow our demo and have a mostly correct result. We say mostly because there are of course some minor adjustments that you may want to make for your game, since this will not be perfectly the same as using the hand model, just a very close approximation.
So to summarize our plan: We need to add colliders to the appropriate joints on the finger at run time, disable these colliders when the player has an open hand, and then enable them whenever the player closes their fist. We will use capsule colliders and sphere colliders to best approximate the shapes, and to ensure that we are doing this as efficiently as possible. With that, let’s begin by diving into our implementation.
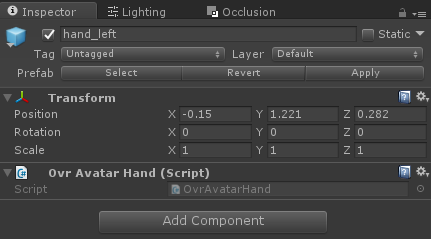
To start off, we need to update some of the scripts provided by Oculus in order to start adding colliders to each of our objects. Specifically, we want to do this in the render scripts, as they contain much more useful information. You can do this by finding the OvrAvatarSkinnedMeshRenderComponent.cs script and opening that up. This is the script that is actually used render the hand models, and contains some useful information about the bones that are created.
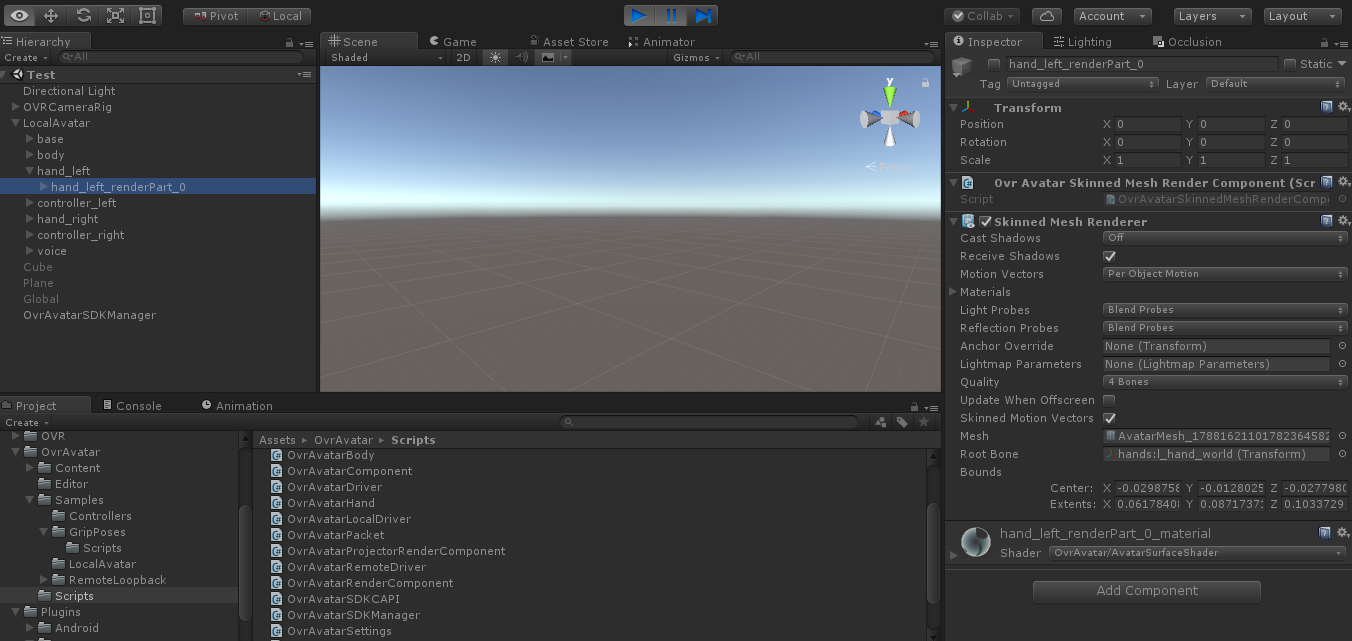
Opening up this script, you’ll see that it only has a few lines of code within it. At the top, it declares two variables: mesh and bones. The first variable, mesh, simply stores the mesh to be rendered (in this case our hands) which is not super useful as mentioned previously. The second variable however is much more interesting. The bones variable stores a list of bones associated with each mesh. In the case of our hands, it stores the individual parts that make up our hands. What’s interesting about this structure is that is breaks the hands down into some very useful sections: At the top it stores the hand as a whole. Within this it stores the palm (called grip in this case), and each individual finger. What gets more interesting however is that for each finger, it stores the individual joints that make up each finger, allowing us to easily iterate through and create colliders for the fingers individually. This is great from a developer perspective, as we no longer have to update animations for each finger movement, we can just attach colliders to the appropriate joints and the SDK will handle the animations for us.
Let’s go ahead and dive into some basic setup for our code. Since each bone is stored within the bones array, we simple need to iterate through each bone, creating a collider for each bone. Several bones however can be ignored, which is identifiable via the “ignore” in their name. Thus, if the name of the transform has ignore in it, we can simply skip over it. The code will look like this:
    foreach(Transform bone in bones) {
        if (!bone.name.Contains("ignore")) {
            CreateCollider(bone);
        }
    }
This loops is very straightforward, so there really isn’t much more to say about it. This should be put in the Initialize method, resulting in the following code:
    internal void Initialize(ovrAvatarRenderPart_SkinnedMeshRender skinnedMeshRender, int thirdPersonLayer, int firstPersonLayer, int sortOrder) {
        mesh = CreateSkinnedMesh(skinnedMeshRender.meshAssetID, skinnedMeshRender.visibilityMask, false, thirdPersonLayer, firstPersonLayer, sortOrder);
        bones = mesh.bones;
        foreach(Transform bone in bones) {
            if (!bone.name.Contains("ignore")) {
                CreateCollider(bone);
            }
        }
    }
The interesting method is the CreateCollider method, which will actually go through and create the colliders for each joint. This method is a bit more complex, though not by much. We’ve included the measurements for each finger that we are currently using, though this of course may be better to change dynamically. This is something we are still experimenting with in the Oculus Avatar SDK however, and so for now we are using the following numbers. You can place this at the beginning of your code to use in the CreateCollider method later:
    private struct FingerBone {
        public readonly float Radius;
        public readonly float Height;
        public FingerBone(float radius, float height) {
            Radius = radius;
            Height = height;
        }

        public Vector3 GetCenter(bool isLeftHand) {
            return new Vector3(((isLeftHand) ? -1 : 1) * Height / 2.0f, 0, 0);
        }
    };

    private readonly FingerBone Phalanges = new FingerBone(0.01f, 0.03f);
    private readonly FingerBone Metacarpals = new FingerBone(0.01f, 0.05f);
The finger bone structure that we use allows for configurable per-joint settings. As time goes on and as the Oculus Avatar SDK changes, this will enable our code to create more precise colliders for the joints. We setup our Phalanges to have a radius of 0.01 and a height of 0.03, whereas the metacarpals have a height of 0.05 instead. The get an idea of what this looks like, we’d recommend taking a look at this image to better understand the anatomy of the hand. Again, these do not provide perfect measurements, and could be made more accurate by designing for each joint size specifically, but for our demo these will work more than fine.
Let’s go ahead now and make our CreateCollider method. This method handles two cases: When we get a finger, and when we get the palm of a hand. For the fingers we will create capsule colliders with the previously created properties, and with the hands’ palms we will use a sphere collider. Let’s start by showing the code:
    private void CreateCollider(Transform transform) {
        if (!transform.gameObject.GetComponent(typeof(CapsuleCollider)) && !transform.gameObject.GetComponent(typeof(SphereCollider)) && transform.name.Contains("hands")) {
            if (transform.name.Contains("thumb") || transform.name.Contains("index") || transform.name.Contains("middle") || transform.name.Contains("ring") || transform.name.Contains("pinky")) {
                if (!transform.name.EndsWith("0")) {
                    CapsuleCollider collider = transform.gameObject.AddComponent<CapsuleCollider>();
                    if (!transform.name.EndsWith("1")) {
                        collider.radius = Phalanges.Radius;
                        collider.height = Phalanges.Height;
                        collider.center = Phalanges.GetCenter(transform.name.Contains("_l_"));
                        collider.direction = 0;
                    } else {
                        collider.radius = Metacarpals.Radius;
                        collider.height = Metacarpals.Height;
                        collider.center = Metacarpals.GetCenter(transform.name.Contains("_l_"));
                        collider.direction = 0;
                    }
                }
            } else if (transform.name.Contains("grip")) {
                SphereCollider collider = transform.gameObject.AddComponent<SphereCollider>();
                collider.radius = 0.04f;
                collider.center = new Vector3( ((transform.name.Contains("_l_")) ? -1 : 1) * 0.01f, 0.01f, 0.02f);
            }
        }
    }
To start, we first check that the transform’s game object does not already have a capsule collider or a sphere collider, and that it contains the string “hands” (indicating that it is part of the hand bones). Next, we check if it contains one of several strings, indicating that it is a finger. We also check that it does not end with the number 0. This is done because the pinky finger has an additional bone that does not need to be used in our demo. We then create a capsule collider in this case, and check if the transform name ends in a one. If it does not, we use the Phalanges properties to adjust the capsule collider correctly. If it does, we use the Metacarpals properties to adjust our capsule collider. For each one, we offset the center as well, and pass in whether it is the left hand or not by checking if the name contains the string “l”, which indicates the hand we are iterating through the bones of. This is because the left hand has a negative X axis locally, whereas the right hand has a positive X axis when changing the center location. If the transform name contains “grip” instead of one of the finger strings, we instead create a sphere collider. We give it a radisu of 0.04, and set its center to a vector with an x position of either -0.01 or 0.01 (depending on if it is a left hand or not due to the X axis offset again), a y position of 0.01, and a z position of 0.02.
At this point, if you go ahead and run your application and pause it to check the scene, you will see the green outlines of all of our colliders when you select a hand. One thing to note however is that the collisions will not seem to be working correctly. This is because we need to add a Rigidbody to each hand! Do so in the Unity editor, making sure that each one does not use gravity and is set to be kinematic. Your final scene when running should show a hand that looks like this when paused:

At this point, our collisions will be all set, but you now won’t be able to pick objects up! This is because each time you get close to an object to pick it up, your hand is now pushing the object away. What we want to do is only enable the collisions for our colliders when the player presses the hand triggers, thereby making a fist (the normal triggers which control the index finger will not need to be pressed, allowing for players to poke objects). This is pretty straightforward, as all we need to do is disable collisions on the rigidbody for each hand when the hand triggers are not being pressed enough. You can do this by updating the UpdatePose method in OvrAvatarHand.cs to be as follows:
    public void UpdatePose(OvrAvatarDriver.ControllerPose pose) {
        if (GetComponent<Rigidbody>() != null) {
            GetComponent<Rigidbody>().detectCollisions = pose.handTrigger >= 0.75f;
        }
    }
This will enable collisions only when the hand trigger is pressed enough to make a fist. However, this does not solve the issue of when we are holding an object, to prevent us from knocking other objects over. To do that, we need to add the following addition to our OvrAvatarHand script:
public Hand handScript;
This will allow us to check the state of the hand, and make sure we are not holding anything or touching anything when we make our fist that could be picked up. Thus we want to update our UpdatePose method to be like this:
    public void UpdatePose(OvrAvatarDriver.ControllerPose pose) {
        if (GetComponent<Rigidbody>() != null) {
            GetComponent<Rigidbody>().detectCollisions = handScript.mHandState == Hand.State.EMPTY && pose.handTrigger >= 0.75f;
        }
    }
In the Unity editor, go ahead and attach the appropriate scripts to each hand. We need to make one minor adjustment to our Hand.cs script as well, in order to ensure that if a player’s hand touches and object with a closed fist that it does not pick it up. This can be done by updating the OnTriggerEnter method to be as follows:
    void OnTriggerEnter(Collider collider) {
        if (mHandState == State.EMPTY && OVRInput.Get(OVRInput.Axis1D.PrimaryHandTrigger, Controller) < 0.5f) {
            GameObject temp = collider.gameObject;
            if (temp != null && temp.layer == LayerMask.NameToLayer("grabbable") && temp.GetComponent<Rigidbody>() != null) {
                mHeldObject = temp.GetComponent<Rigidbody>();
                mHandState = State.TOUCHING;
            }
        }
    }
The big change is the addition of the && OVRInput.Get(OVRInput.Axis1D.PrimaryHandTrigger, Controller) < 0.5f check when we touch an object. This ensures that if we have made a fist that we do not pick up the object, as only when we make a fist while after touching an object do we want to pick it up. At this point, all of our collisions will be setup and ready to go. We recommend putting a few blocks around on a table like cube and playing around with it. This is an example of the test scene that we created:
At this point, we have all of our collisions setup, but the current hands being used don’t look all too great. Let’s go ahead and actually set this up to use the avatar that the player has created for themselves. This is a relatively simple thing to do: We first need to initialize the Oculus Platform, then get what users are logged in. Once we get the logged in player, we check that there were no errors, and then set the ID of the Avatar to the player’s ID. This is all done in a global object in our scene, and will look like this:
    using UnityEngine;
    using Oculus.Avatar;
    using Oculus.Platform;
    using Oculus.Platform.Models;
    using System.Collections;

    public class PlatformManager : MonoBehaviour {
        public OvrAvatar Avatar;

        void Awake () {
            Oculus.Platform.Core.Initialize();
            Oculus.Platform.Users.GetLoggedInUser().OnComplete(UserLoggedInCallback);
            Oculus.Platform.Request.RunCallbacks();
        }

        private void UserLoggedInCallback(Message<User> message) {
            if (!message.IsError) {
                Avatar.oculusUserID = message.Data.ID;
            }
        }
    }
Attach this script to a global object in your scene, then drag your LocalAvatar prefab in your scene onto the script’s Avatar spot in the inspector view to use it with the script. The final setting you’ll want to change is to set your Oculus Rift App ID in both the Oculus Platform settings and the Oculus Avatar settings found in the toolbar. This will enable the Platform and Avatar SDKs to properly be enabled. Now when you run your demo, you should see your avatars hands appear as you designed them! The final demo of everything can be seen below:
The Oculus SDK is constantly being improved. As of February 3rd, a new utility script is included for grabbing objects that fixes the angular velocity issue we mentioned in our last post. In the future, we will probably come back and do a new tutorial series on how to handle collisions and picking objects up when the SDKs for these have changed, but for now, this current one should be enough to get most people started. We know this has been a lot to digest, but we hope this two part series was helpful for getting started with Oculus Touch! Have any questions or comments? Feel free to leave them below and we will do our best to answer them! As always, don’t forget to like and share this post if you found it helpful. Happy developing!