Gerald McAlister | January 11, 2017 | Dev Diary


Gerald McAlister | January 11, 2017 | Dev Diary
One of the biggest developments in virtual reality over the past few years has been the introduction of motion controllers to the space. In the past, motion controllers generally allowed for just waving, but today’s controllers are much more sophisticated, allowing for full 6 degrees of freedom tracking. The result is a much more immersive experience, but also a much more complex development cycle. Here at RGB Schemes, we have been experimenting with how to both increase immersion with motion controllers, while also easing our development process with them. Today, we want to share our approach to using your hands in virtual reality so far!
For our first prototype, we really wanted to have a simple sample scene where you could throw some balls into a bin. The first iteration of this can be seen above, and worked fairly well. We were able to get most of the physics working fairly quickly, though our initial bin ran into some issues with holding objects. This turned out to be due to how we assembled the bin in Unity though, and won’t be covered in this post. On the ground, we placed a green mat which was set to be a “bouncy” material, allowing you to bounce the balls off of it into the bin.
The process for these physics was very bare, and consisted only of Unity’s built in physics. We were able to have a user pick up a ball by simply attaching a joint between the ball and the player’s hand when the user pressed a button while touching a ball. This made it very easy to dictate which objects could be picked up by using Unity’s layering system. The results were actually very smooth, and resulted in a high quality system where you can quickly designate what can be picked up by placing it on the correct layer.
For those of you who are just interested in the source code, we have a full Unity project available here on our GitHub page that you can download and play around with to get started immediately. It’s designed for the HTC Vive, though should be pretty easy to adapt to the Oculus Rift if you need to. Note that there are some differences in the GitHub repository, as it contains some extra features that we will cover in a future developer diary.
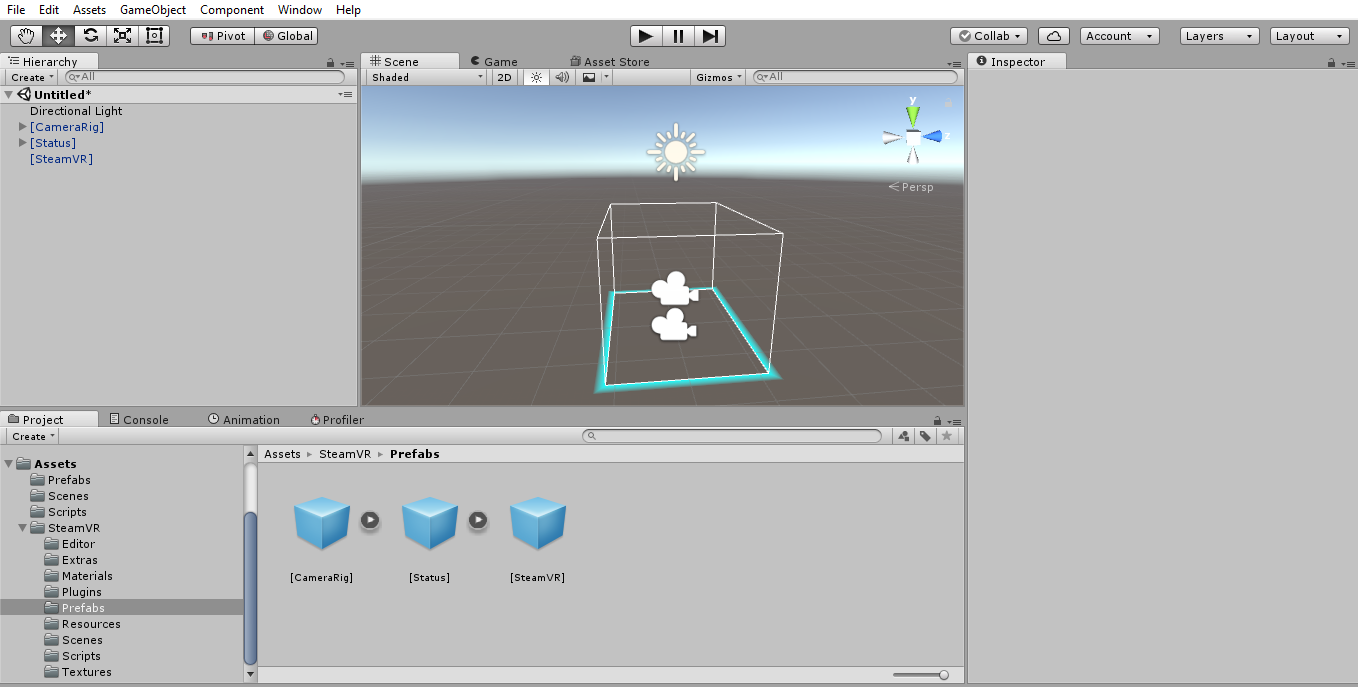
To get started from scratch, you will need an empty Unity project and the SteamVR Plugin for Unity. Once you have all of this setup, go ahead and create an empty scene, and drag in the CameraRig, Status, and SteamVR objects from the SteamVR Prefabs folder (remove the Main Camera object from the default scene if it exists). Your scene should look like this now:
Once that is done, we now need to write a script for the hands. The script in the GitHub repository includes some additional code for a teleport laser, but we are going to skip past that and focus on just the code for picking up objects. A future post will cover how a teleport laser works. The implementation of the hands are very simple. We need to detect whether the user is touching a ball, then detect if they are pressing the grip buttons while doing so. If both of these conditions are true, we then create a joint between the ball and a designated point on the hand. When the player releases the trigger, we destroy the joint and apply the controllers current velocities to the ball, allowing it to be thrown across the room.
Go ahead and create a script called Hand.cs, and at the beginning of it, define the following variables:
    private enum State {
        EMPTY,
        TOUCHING,
        HOLDING
    };
    public State mHandState = State.EMPTY;
    public Rigidbody AttachPoint;
    public bool IgnoreContactPoint = false;
    private SteamVR_Controller.Device mControllerDevice;
    private SteamVR_TrackedObject mTrackedObj;
    private Rigidbody mHeldObject;
    private FixedJoint mTempJoint;
The enumerator State contains the possible states for a hand (e.g. empty, touching, and holding), and the mHandState variable manages what state the hand is actually in (starting out as empty). Next we have the attach point, which is where the object we pick up will be attached to on our hand model (this can be any sub-object to our controller that has a RigidBody component). We have a boolean underneath this that dictates whether we will move the object to the attach point exactly, or allow the user to pick up an object but have it rest in their hand based on how they grab it (i.e. move the object relative to how we picked it up). Both of these are set in the Unity editor when attaching the script to an object.
In order to track our controller’s buttons and velocities, we need to create a controller device, aka: mControllerDevice, but to track the actual position of the controller, we need to get a tracked object from the controller, i.e.: mTrackedObj. Finally, we want to determine what the actual held object is via mHeldObject and keep track of the temporary joint we create too (mTempJoint) so we can delete it when the player releases the grip button. Notice that mHeldObject is a rigid body, which means we can apply the velocities of the controller to the object directly. This is important however, as the objects that players throw will need a RigidBody in order for this to work. Also, because we are using joints, our controllers will also need a rigid body component attached to them.
Now that we have our variables defined, it’s time to start initializing some things. When you created your Hand script, there should be two default methods already thanks to Unity: Start() and Update(). In the Start() method, go ahead and add the follow snippet of code:
    mHandState = State.EMPTY;
    mTrackedObj = GetComponent<SteamVR_TrackedObject>();
    mControllerDevice = SteamVR_Controller.Input((int)mTrackedObj.index);
The first line simply sets the hand state to be a default of empty again, ensuring that it always starts as empty. The next line retrieves the tracked object associated with the object that the script is attached to. From that, we can get the controller device, by passing the tracked object’s index into the SteamVR_Controller.Input method. At this point, we now have everything we need to use our controllers.
Now we need to handle the various states that the hand can be in. To start, go ahead and rename the Update() method to FixedUpdate(). This will ensure that our updates are done in sync with the physics in our demo, which is important because we are dealing with RigidBodies. Now in this method, place the following snippet of code:
    switch (mHandState) {
        case State.TOUCHING:
            if (mTempJoint == null && mControllerDevice.GetPress(SteamVR_Controller.ButtonMask.Grip)) {
                mHeldObject.velocity = Vector3.zero;
                mTempJoint = mHeldObject.gameObject.AddComponent<FixedJoint>();
                mTempJoint.connectedBody = AttachPoint;
                mHandState = State.HOLDING;
            }
            break;
        case State.HOLDING:
            if (mTempJoint != null && mControllerDevice.GetPressUp(SteamVR_Controller.ButtonMask.Grip)) {
                Object.DestroyImmediate(mTempJoint);
                mTempJoint = null;
                throwObject();
                mHandState = State.EMPTY;
            }
            break;
    }
This may seem like a lot of code, but let’s take it piece by piece. We promise it’s not too bad! To start, we have a switch statement, which allows us to check for the 2 states we want to handle: touching and holding. Notice that we do not handle the case for an empty hand. This will be handled in another section of code. When touching an object, we first want to check that the player is not holding another object already. This is done by checking that our temporary joint is null (meaning that it is not in use already). Next, we use our controller device to check if the grip button is pressed. If so, our soon-to-be held object has its velocity set to 0 (note that it is a vector) in case the object is moving. We then check if we should ignore the contact point and attach the object directly to where our attach point is, doing so by setting the held object’s position. Next, we set our temporary joint’s connected body to the controller’s attach point, and set the hand state to holding at the end.
When the user is holding an object, we effectively do these steps the opposite way: We start by checking that a joint exists (indicating that we are indeed holding an object), and then check that the player has released the grip button. If so, we use DestroyImmediate to quickly destroy the temporary joint, and then set the joint to null so we can reuse it later. We call a throwObject method (which we will create in a second here) that applies the velocities from the controller to the object, and then finally set the hand state to empty. One thing to note is that we have been told DestroyImmediate is not a good method to call as it can make your application unstable. However, we need the immediacy of this method, and so far in our tests it has proven to be very stable for us. If you run into random crashes when throwing objects however, it may be worth changing this to just Destroy instead, though this can introduce some issues with throwing as well.
At this point, we now handle the basic states of the hand, but we still will not be able to pick objects up. To do this, we need to setup collision triggers to detect when we touch and stop touching objects. To do this, we need to create two new methods. The first is OnTriggerEnter, and looks like so:
    void OnTriggerEnter(Collider collider) {
        if (mHandState == State.EMPTY) {
            GameObject temp = collider.gameObject;
            if (temp != null && temp.layer == LayerMask.NameToLayer("grabbable") && temp.GetComponent<Rigidbody>() != null) {
                mHeldObject = temp.GetComponent<Rigidbody>();
                mHandState = State.TOUCHING;
            }
        }
    }
What this method does is handle any time an object triggers a collision with the player’s hands. If the hand state is empty, then we check that the object is not null, check that it is on the grabbable layer, and check that it has a RigidBody component. If so, we set the currently held object to its RigidBodyand set the hand state to touching. At this point, the player can press the grip buttons and our FixedUpdate method will allow them to grab the object.
We now need to handle when the player is no longer touching an object nor holding it. This method is pretty short:
    void OnTriggerExit(Collider collider) {
        if (mHandState != State.HOLDING) {
            if (collider.gameObject.layer == LayerMask.NameToLayer("grabbable")) {
                mHeldObject = null;
                mHandState = State.EMPTY;
            }
        }
    }
Again, this does the OnTriggerEnter method in reverse essentially: When our hand is no longer colliding with an object, we check that the hand state is not set to holding. We check that the previously colliding object’s layer is set to grabbable, and if so, we set the held object to null and the hand state to empty. This ensures that our FixedUpdate method will no longer allow the object to be grabbed since we are no longer touching it.
The final step now is to allow the object to be thrown. This is done via the throwObject() method mentioned above in the FixedUpdate section. The code for this method is as follows:
    private void throwObject() {
        var origin = mTrackedObj.origin ? mTrackedObj.origin : mTrackedObj.transform.parent;
        if (origin != null) {
            mHeldObject.velocity = origin.TransformVector(mControllerDevice.velocity);
            mHeldObject.angularVelocity = origin.TransformVector(mControllerDevice.angularVelocity);
        } else {
            mHeldObject.velocity = mControllerDevice.velocity;
            mHeldObject.angularVelocity = mControllerDevice.angularVelocity;
        }
        mHeldObject.maxAngularVelocity = mHeldObject.angularVelocity.magnitude;
    }
To start, we need to get the origin of the tracked object. We do this by checking whether the controller’s tracked object has an origin point, and if it does not, we then set it to the tracked object’s parent transform. If the origin is set properly (i.e. it is not null), we apply the origin’s velocity and angular velocity (for rotation) to the held object. Otherwise, we apply the controller device’s velocities to the held object. Finally, we set the max angular velocity to the magnitude of the held object’s angular velocity. This ensures that we do not get crazy rotation speeds for the object.
At this point, the hand file is completed. There is definitely a lot of code to this, so if you want to just copy the Hand.cs code from the project, you can do so from here. Again please note that there is additional code in here for a teleport laser, which we will cover in a future post, but can be ignored for the time being.
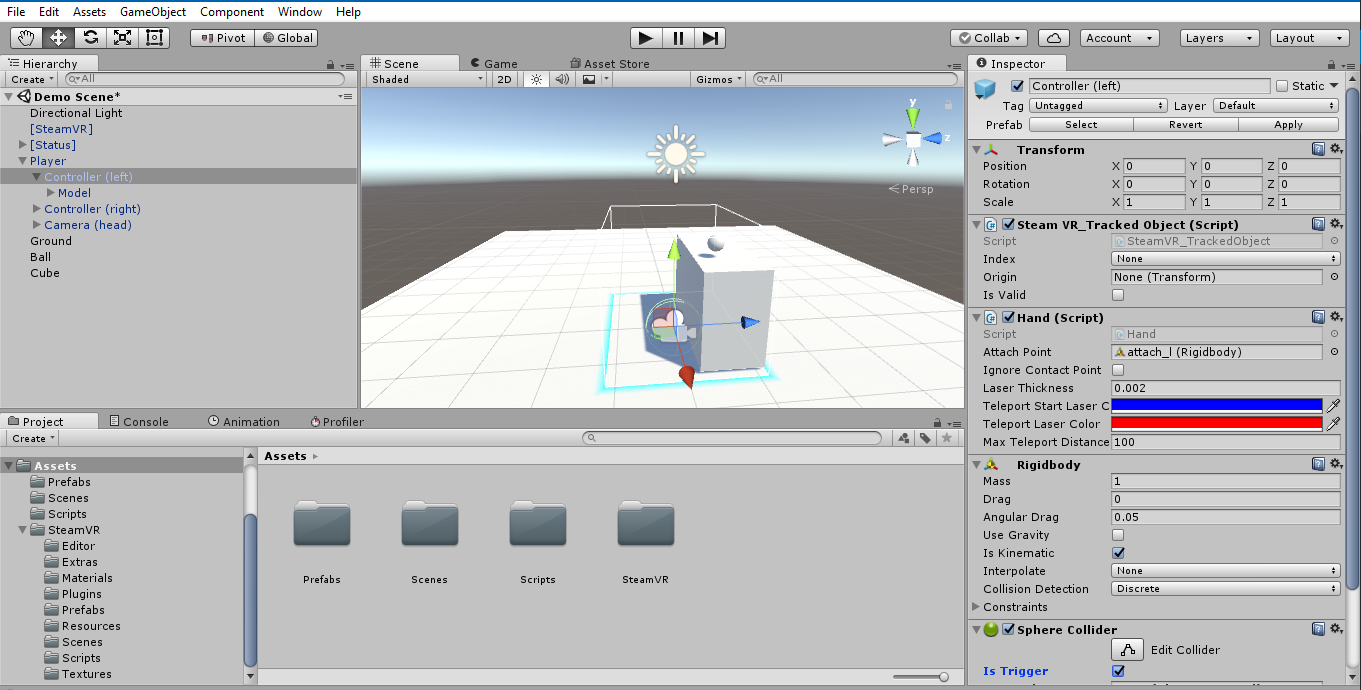
Now that the hand script is complete, we need to attach it to our hands in our demo scene. To do this, expand the CameraRig object in the Hierarchy window, and select one of the hands. Drag the Hand script to the inspector window, adding it as a component. From there, you need to setup an attach point, which should be a rigid body under the controller model in the hierarchy. Also add a sphere collider to the controller, enabling the “Is Trigger” checkbox. This will allow our OnTriggerEnter and Exit methods to work properly with the controllers. This should look similar to this:
At this point, you will have your hands in the scene, but nothing to pick up! Go ahead and start by adding a sphere to the scene. Make sure that it has a sphere collider (do not check the “Is Trigger” checkbox, as that will break the ball’s collisions) and a RigidBody as well. When you run the scene, you’ll notice that the ball still can’t be picked up! This is because we need to put it on the correct layer! On the ball object, click on the layer drop-down menu, and select “Add Layer…”. Create a new layer called “grabbable” and set the ball to be on that layer. Now when you enter your scene, you should be able to pick the ball up, and throw it around! Make sure you create a floor so that the ball does not fall forever! Your scene should look similar to this:

At this point, our scene is rather basic, but functional enough that you can now start adding other types of objects to the scene. Any objects on the grabbable layer can be picked up by players, while any objects not on this layer cannot be! You can of course remove this by removing our layer check from the Hand script. This will make anything with a RigidBody throwable for a player!
One of the big things we wanted to do was really sell the idea that you are interacting with objects in another world. To do this, we looked into a few additional features to help increase immersion. Some of these worked incredibly well, and resulted in some pretty crazy scenarios, while others began to make playing our demos even harder. Here are a few of the different ones we explored.
The first thing we did was add in a small amount of vibration any time the player touched an object that they can pick up. Initially the vibrations were 500 milliseconds, but we found that increase this to as high as 2000 milliseconds (2 seconds) resulted in a better experience, as you “felt” the object more in-game. Doing this is pretty straightforward, and can be done in just a single additional line to our previous code:
mControllerDevice.TriggerHapticPulse(2000);
Collisions in virtual reality turned out to be a much trickier problem than we thought it would be originally. One of the major issues with it is that it can make it harder for a player to pick something up when enabled. On the other hand, it also creates for interesting gameplay possibilities, as you can begin to do things like punch balls across the room and flip tables. Overall, we recommend using a hand model, and only enabling collisions when the player makes a fist (or another specific hand shape), enabling them to easily pick objects up still.
This was definitely a lot to digest for a first development diary, and was a bit more code heavy then originally intended. That said, we hope that those of you who have read through the entire post found it interesting. Some fun things to experiment with in this: Try figuring out how to make objects not be affected by gravity, but still be allowed to drag around. This can be useful for things such as cameras in game that you can move around and stick wherever you want.
We plan to make development diaries a weekly thing, though we may post more than one per week on occasion. We’d love feedback in the comments section below about what you find helpful from these posts, as well as any improvements we can make to these. Tune in next week for our next development adventure!