Gerald McAlister | January 25, 2017 | Dev Diary


Gerald McAlister | January 25, 2017 | Dev Diary
Since our first two developer diaries were very heavy on coding, we figured that for this week’s post we would take it back to the basics. Today we wanted to talk about creating a simple virtual reality project in Unity, and some of the basics for setting up a project. We’re going to cover how to do this for the Oculus Rift, HTC Vive, GearVR, and Google Daydream, which are the platforms that we are currently interested in here at RGB Schemes. Many of these examples however, should be fairly straightforward to convert to other platforms, so even if you are targeting another platform, this should hopefully still be useful! With that, let’s dive right into creating our base project.
To start with, we are going to create a base project that will be used at the start of each project. If you’d like, you can make several of these for each project that we will cover, but ultimately you just need one for your target platform. The base project will be a simple Unity scene from the ground up, with a few extra things in it that we can see, in order to verify that we have correctly setup our project in virtual reality. If you are developing for Google Daydream however, skip directly to the Google Daydream section and start with that. Google Daydream has a couple of requirements before you can jump right into the base project.
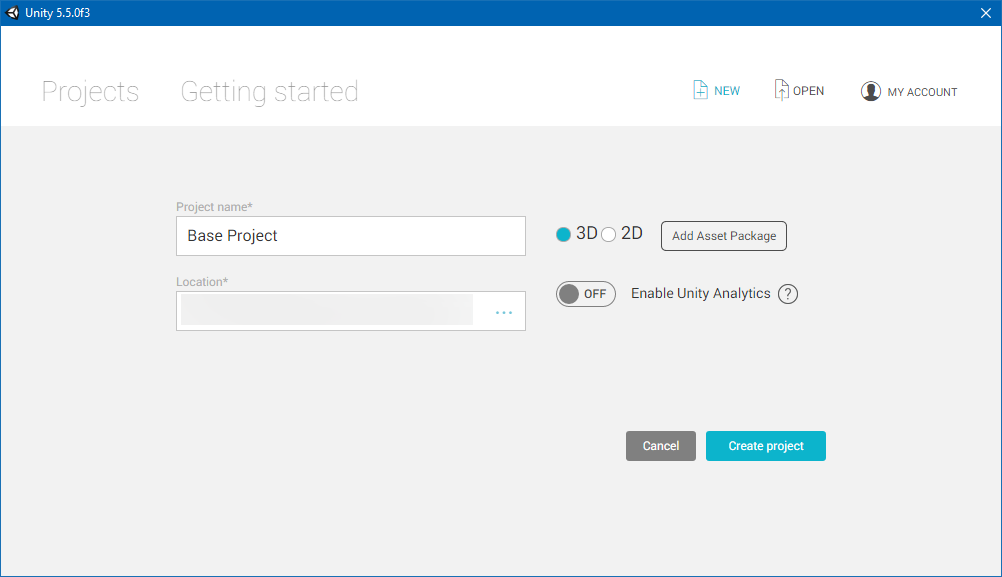
To start with, create an empty 3D project in whatever folder you are interested in, like what you see on the right. This will will setup your project with nothing more than a small starting scene with a camera and a directional light.
While we could stop there, we should go ahead and add in some additional things, in order to be able to verify that we are in virtual reality when we move our head. At this point, you may add whatever you want to, but for our simple test scene, we are just going to add a small piece of ground, and some cubes around the scene. This will give us some directions to look, and an indication as to the directions we are looking. Go ahead and save this into a scenes folder (or another folder name if you’d like), that way we will have it to use later. At this point, I would recommend creating several copies of this project if you plan to make each of the next projects that we will discuss. Otherwise, just keep the one, and skip to the setup that your are interested in below!
The HTC Vive is the first platform we will discuss. To start, you’ll want to import the SteamVR Plugin into your Unity project. Head over to here to download the plugin into your Unity project. This will create a SteamVR folder in your project with all of the neccessary components to create an HTC Vive application. At this point, you may see a popup asking you to change your project settings. We recommend doing this in order to properly setup for the HTC Vive.
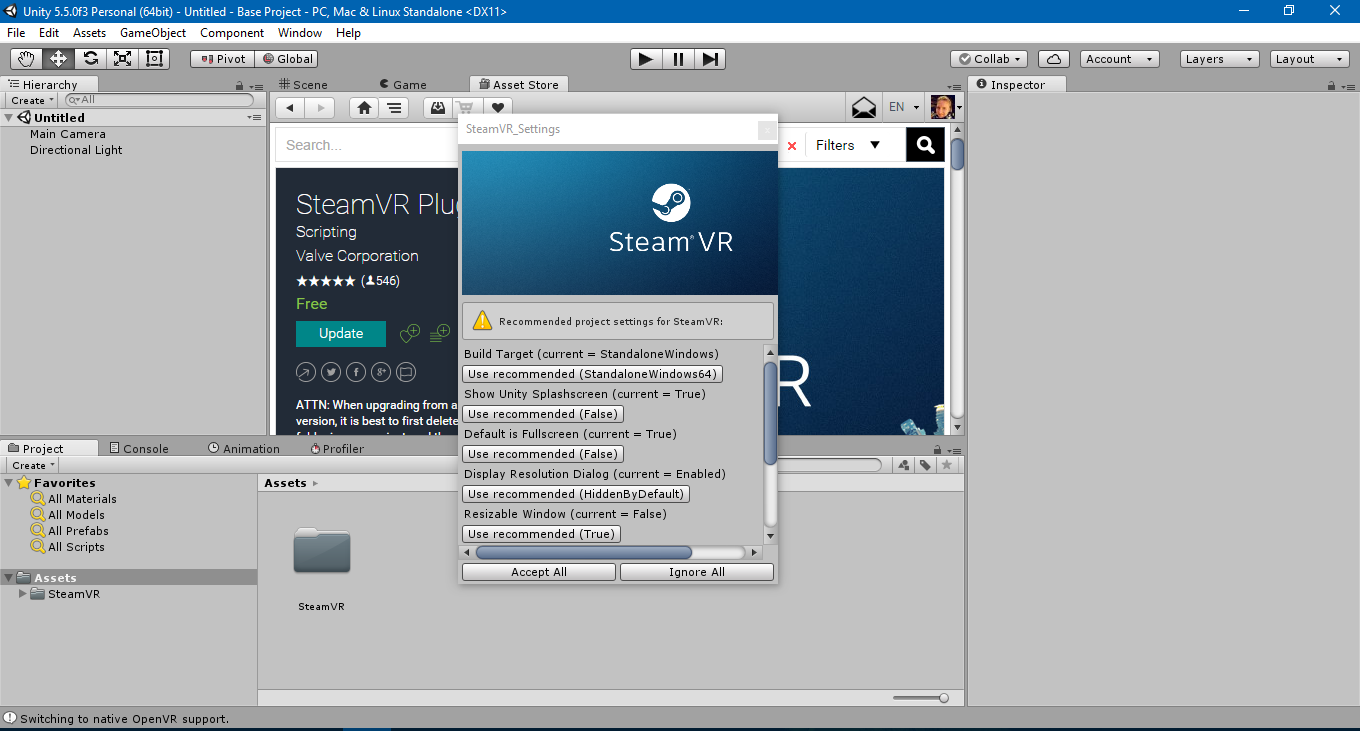
A small dialog saying “You made the right choice!” should appear, confirming that your project is setup correctly for the HTC Vive. At this point, we simply need the correct assets in our scene to make use of the hardware. This is easy enough, just open the SteamVR/Prefabs folder and drag the [CameraRig], [Status], and [SteamVR] prefabs into your scene. Then, delete the camera (called Main Camera) that was in your scene previously. At this point, when you run your project, you should see everything appear in the headset as expected, with controllers and everything visible! You should also be able to walk around, press buttons on your controllers, and have everything generally work in virtual reality.
At this point, you can go ahead and start following our previous developer diaries here and here for how to add some interactions to your game. Under the [CameraRig] prefab specifically, you’ll notice 3 sub-components: Controller (left), Controller (right), and Camera (head). Each of these is exactly what they say they are: the left and right controllers and the player’s head. Thus, if you want to, you can also just attach colliders to these objects, and knock things around for a simpler interaction model to start.
The setup for the Oculus Rift is very similar, but still has some small differences. Once you have your base project setup, go ahead and head here to download Oculus’ Unity tools. You’ll want to find the “Oculus Utilities for Unity X” (X will be 5 at the time of this post, in the future it may have newer versions) and click details. Read their EULA, Terms of Use, and Privacy Policy, then click the checkbox and then click the download button. Unzip the newly downloaded archive, and head into the OculusUtilities folder. There will be a file called OculusUtilities.unitypackage, drag this into your project’s Assets view to import it. You’ll notice that no popup occurred asking you to change your project’s settings. This is because they do not handle these settings in the same manner, resulting in two ways you can configure them. The first is to manually go through and setup everything, but the easiest way is to setup your game, then reopen Unity. Once the Oculus prefabs are in your scene and you reload Unity, your settings will be automatically updated.
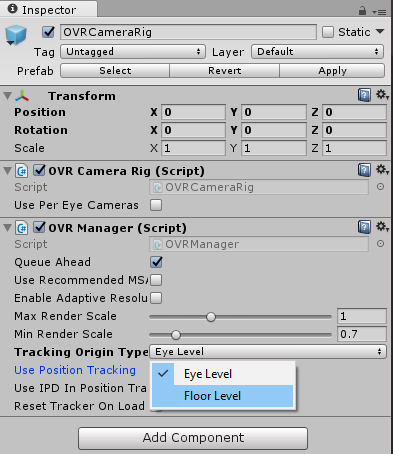
Go ahead and delete your Main Camera and open up the OVR/Prefabs folder. You should see a prefab called “OVRCameraRig”. Drag that into your scene to replace the Main Camera, then go ahead and re-open your Unity project to fix the project settings. Go ahead and run it and you should be able to instantly see everything running in virtual reality, but you may notice something is off: Your head may be through the floor! If you don’t see this, don’t panic either, as this entirely depends on how you placed the camera in your scene and your default settings for the prefab! If you put the object flush with the floor (e.g. the object is on the floor of your game) and you **are **seeing this, you will want to switch the Tracking Origin Type from Head Level to Floor Level. If you placed the object above the floor but seem to be too much higher than the floor, you may need to change this to be Head Level instead. This setting determines where to start the tracking from (the floor or the head).
Once this is set, you should be all ready to go for tracking. Expanding out the Camera Rig in the hierarchy view, you will see that there are a couple of extra objects for the Oculus Rift prefab compared to the Vive: A left, right, and Center eye anchor, a tracker anchor, and a Left and Right Hand anchor object. The left and right eyes are used for rendering the individual eyes, but the center eye is the center of the head. The left and right hand anchors are used for the hands obviously, and you don’t really need to worry about the tracker anchor. If you want, you can setup the hands similar to our Vive hands tutorial, though they will need some minor tweaking to fix. We plan to do a future tutorial on Oculus Rift hands due to these changes. At this point, if you load everything up, you should see the scene in virtual reality, but no hands specifically! This is because there are no default objects to be rendered with your hands. You can of course add cubes yourself, but Oculus provides an SDK for this in their downloads section we mentioned previously. We recommend checking out their tutorials on their site as well for more information. Check back in the future for our tutorial on this as well however!
The GearVR setup is actually exactly the same as on the Oculus Rift section as far as setup goes. Once you have setup your project that way, you will need to then setup your project to run on Android instead of Windows as the platform (By going to File -> Build Settings..). After that, there is one more adjustment that needs to be done for GearVR.
On GearVR, there is a lot of built in security, part of which requires telling your application that the phone that you are testing on is okay even though it is not authorized by the Oculus store. To do this, you need to create what’s called an OSIG file to validate your phone. Follow Oculus instructions here to generate that file. Once you have it, create the following directory structure in your Unity project’s Assets section: Plugins/Android/assets. Place your newly created OSIG file into this new assets folder. Now you can go ahead and install the APK to your phone, and everything should run just like that!
Google Daydream is currently the most complicated platform at the moment, and requires quite a lot to install. To start with, we need to install the Google Daydream technical preview for Unity. You can find the download for this here. Go ahead and Download the Daydream Technical preview, and install that. Once that is done, you can go back up and start setting up your base project once more, but make sure that you use the Unity technical preview that you just downloaded. When that is completed, go back to the download page and download the actual Google Daydream SDK that’s available there as well. This will download another Unity asset package that we will use for this project.
Go ahead and drag the Unity asset package into your Unity project. This will begin importing the Google Daydream assets we need, but can take a while. Now go ahead and set your platform to Android (File -> Build Settings…), drag the GvrViewerMain from GoogleVR/Prefabs into your scene, and then add the GvrControllerMain from GoogleVR/Prefabs/Controller into your scene, right below the player’s head. At this point, your application should be all set to run on a Google Daydream headset. You should be able to look around your scene, and see the controller in your hand as well. Please note that much of this is subject to change however, as again, the SDK is still a technical preview. Google also includes several demos that we highly recommend going through to learn more, as their setup is much more complex than the others we covered.
At this point, you should have a project on each of the current major virtual reality platforms (except for PlayStationVR, which we do not have access to here at RGB Schemes). As time goes on, we expect many more platforms will be introduced, and we hope to add new tutorials for those platforms in the future. Hopefully this will be a helpful getting started guide for many developers, and please stick around for more developer diaries on creating content in virtual reality. If you have any questions or comments, please feel free to leave them below and we will try to answer them to the best of our abilities!